Do you want to create an amazing leaderboard for your quiz? WordPress leaderboard plugin Quiz and Survey Master has an amazing “Advanced Leaderboard” addon, which helps you create a useful leaderboard for your quiz. This add-on has various features you can use to optimize your leaderboard.
Quiz and Survey Master is the most popular WordPress plugin that helps you customize your quizzes according to your preferences. Its user-friendly interface will help you to increase customer engagement.
Below is a detailed breakdown of 9 simple steps to create a leaderboard in the WordPress leaderboard plugin Quiz and Survey Master.
Make sure you have installed the Free QSM Plugin and have Purchased the Premium Advanced Leaderboard Addon which comes bundled in the QSM Pro plan along with 30+ other powerful addons. Click the button below to purchase the Suite of Pro Addons.
What is a WordPress Leaderboard Plugin?
You can understand that a WordPress leaderboard plugin is an effective plugin that tracks and displays rankings, scores, or other performance metrics on your WordPress website. Create interactive content that will engage and motivate your visitors by leveraging the power of a leaderboard plugin.
These plugins have various features including customizable ranking criteria, user management, real-time updates, frontend display, and gamification.
Use this plugin to enhance your website’s user experience by introducing competitive elements, recognizing top performers, and creating a dynamic and engaging environment for your visitors.
Table of Contents
Step 1: Create a New Form
After installation of Quiz and Survey Master to your WordPress site, Add a new form by clicking on “Add New“.
Read the Quick Start guide for starting this plugin.
Give your form a name in the “Quiz Name” field. Select “Quiz” in the “ Form Type” as we want to create a quiz. Select a grading system for your quiz as “Points”.
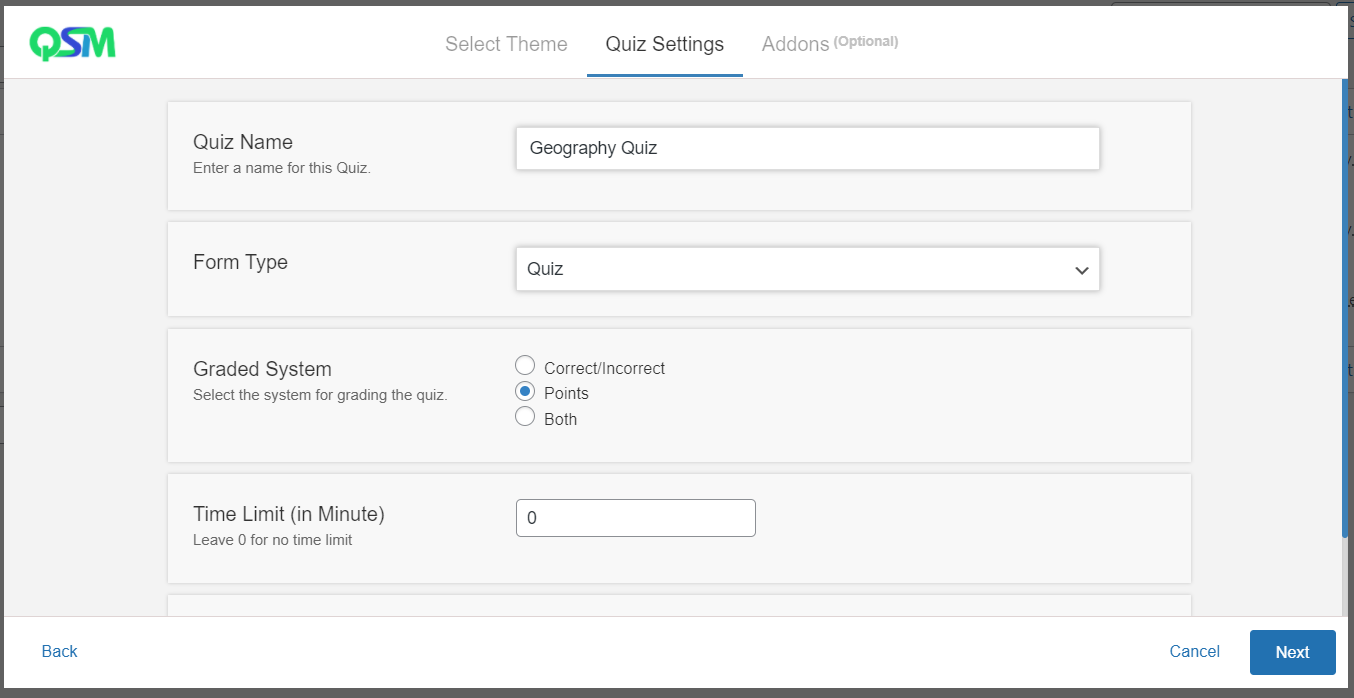
Decide a time limit for your quiz. There will be a default value of “0” indicating no time limit. Change it as per your requirements.
Enabling “Require User Login” will force your users to log in before taking the quiz.
This WordPress leaderboard plugin has various add-ons. It also has over 40+ addons which you might need to improve your quiz. You can purchase them and use them in your quiz per your needs. Next, select “Create Quiz” to create a new form for your quiz.
Step 2: Add Questions
Click on “Question Type” to select the type of question you need for your quiz. This WordPress leaderboard plugin has 15 different question types. Choose one that you need for your quiz.
Next, select the answer type by clicking on “Answer Type”. There are 3 options available for that as well. Select one that meets your quiz requirements.
Now that you have selected question type and answer type, it’s time to add questions and answers to your quiz. Add your questions and respective answers in the corresponding field. In the WordPress leaderboard plugin, you can add as many questions as you want for your quiz.
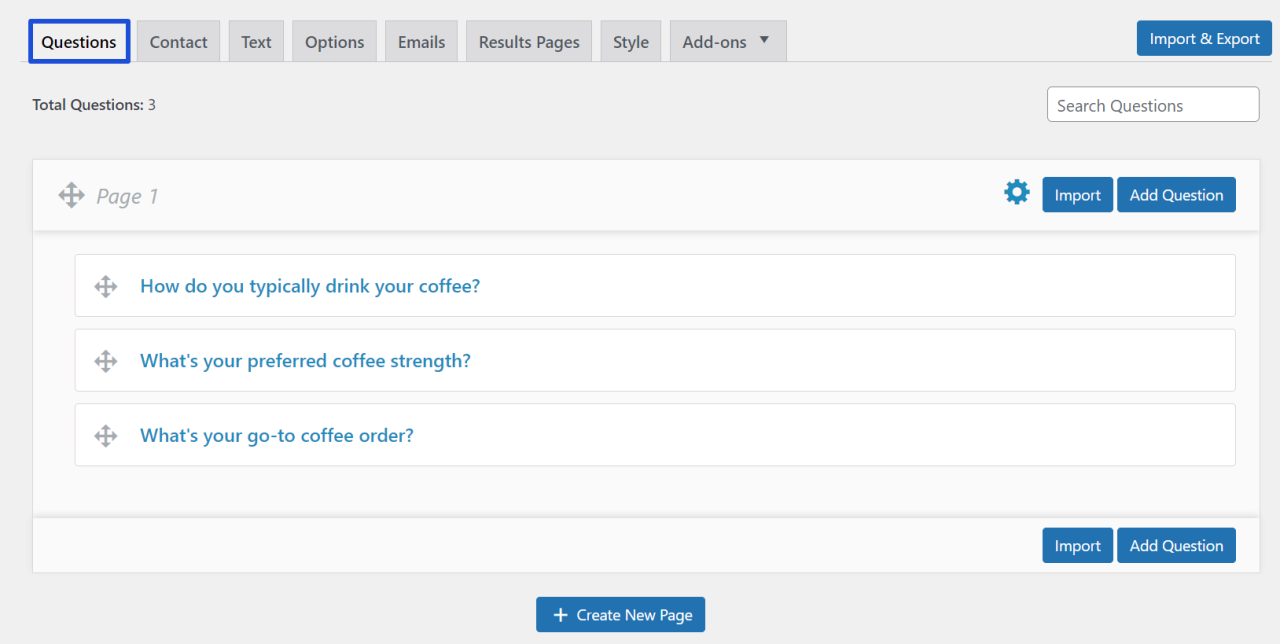
Add another question to the quiz by clicking on “Create New Page” in the bottom corner of the interface. Repeat the same steps and save all the questions for your quiz using this WordPress leaderboard plugin.
Step 3: Create a Contact Form
To collect your user’s information and to approach them for future opportunities, you should create a contact form for your quiz using the WordPress leaderboard plugin Quiz and Survey Master. Using the data collected, you can reach out to them, promoting your business, and generating leads.
Click on the “Contact” tab and then on “Add New Field” to add a new field for the contact form in a quiz.
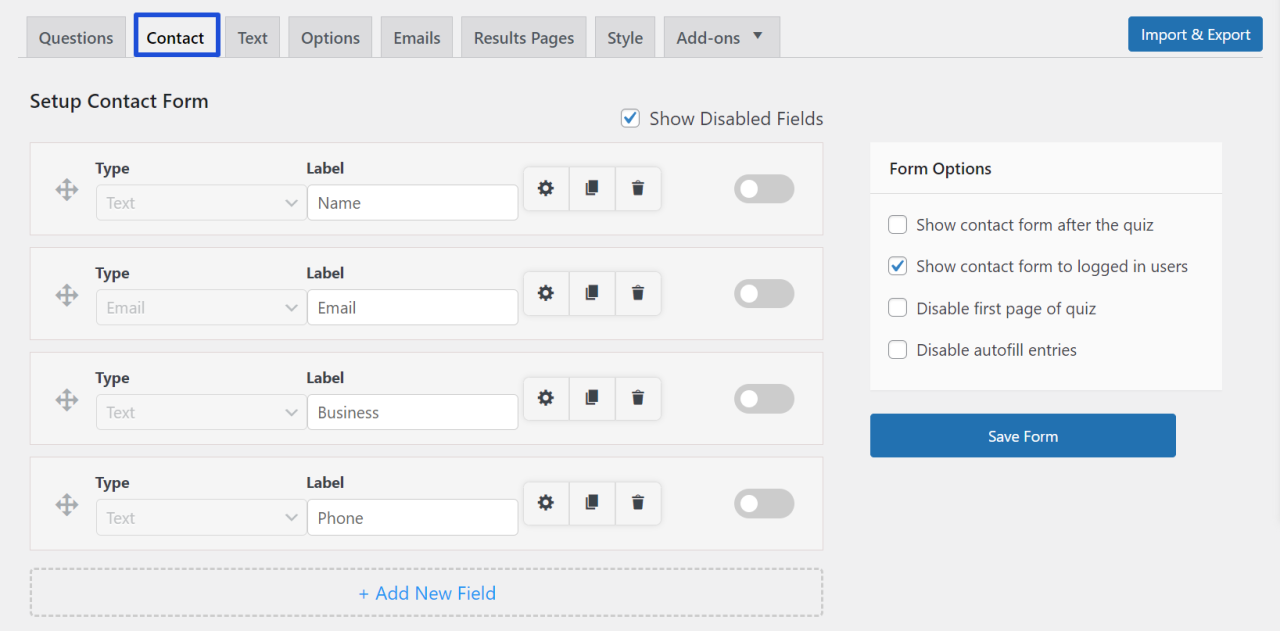
There the 3 types of fields listed in the “Field Type”. Select one for your quiz. After that, click on “Label” to label the field. Whatever you type in the “Label” field, will show as a text that appears next to the field in the quiz.
Next, click on “Form Otptions” and select one option out of four that justifies your field.
After completing all these steps, don’t forget to save it in the quiz by clicking on “Save Form”.
This WordPress leaderboard plugin allows you to delete or duplicate the field by clicking on the respective button that appears on the bottom left of the interface. If you wish to add a new field to the contact form, click on “Add New Field” and perform the same steps.
Step 4: Create Text
This WordPress leaderboard plugin allows you to show text to your users at different times.
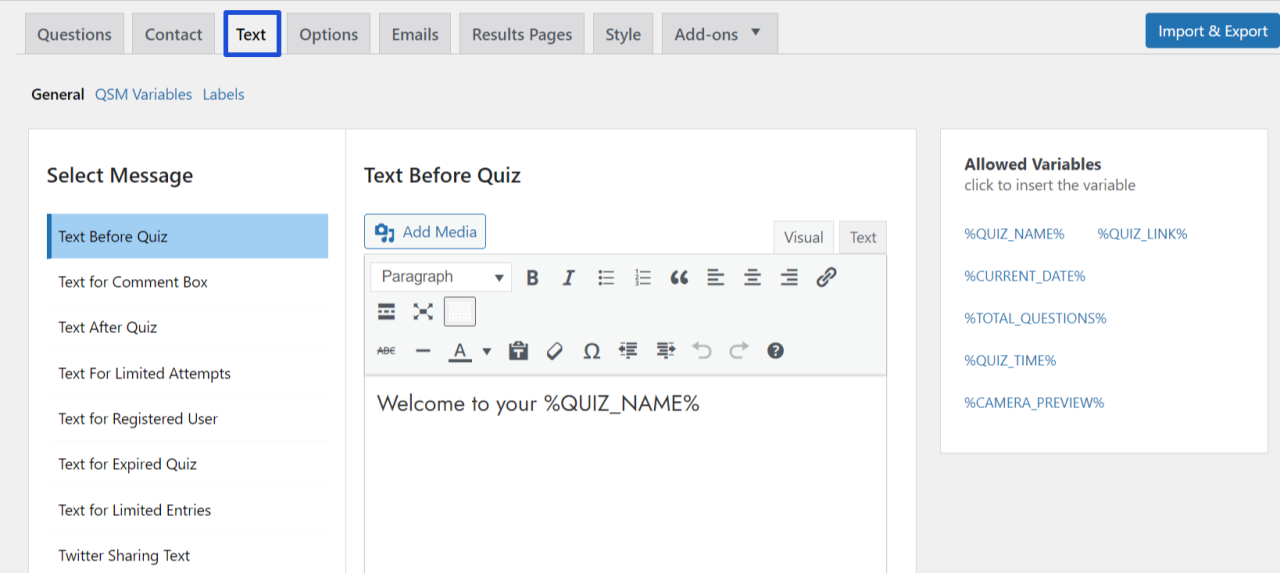
Click on “Select Message” and you will have various options for when the text should appear to the users. Personalize the text using various variables. There are some allowed variables, which you can find on the right side of the interface. Simply click on them to copy and paste in the text field to use in the quiz text.
Customize your labels for the quiz with the various options available in the “Text “ tab. After editing the text, click on “Save Text Message” to save it to the quiz.
Step 5: Customize Options
Quiz and Survey Master offers you various options to customize and personalize your quiz. With the “Options” tab, you have control over the users’ activity and how you want them to perform the quiz. You can explore them and make the best out of them.
Read the Options Tab to get a detailed breakdown of the options tab.
Save all the changes in the quiz by clicking on “Save Changes”.
Step 6: Edit Emails
After taking a quiz you should send your users a mail. You can use the “Email” tab for sending emails to your users.
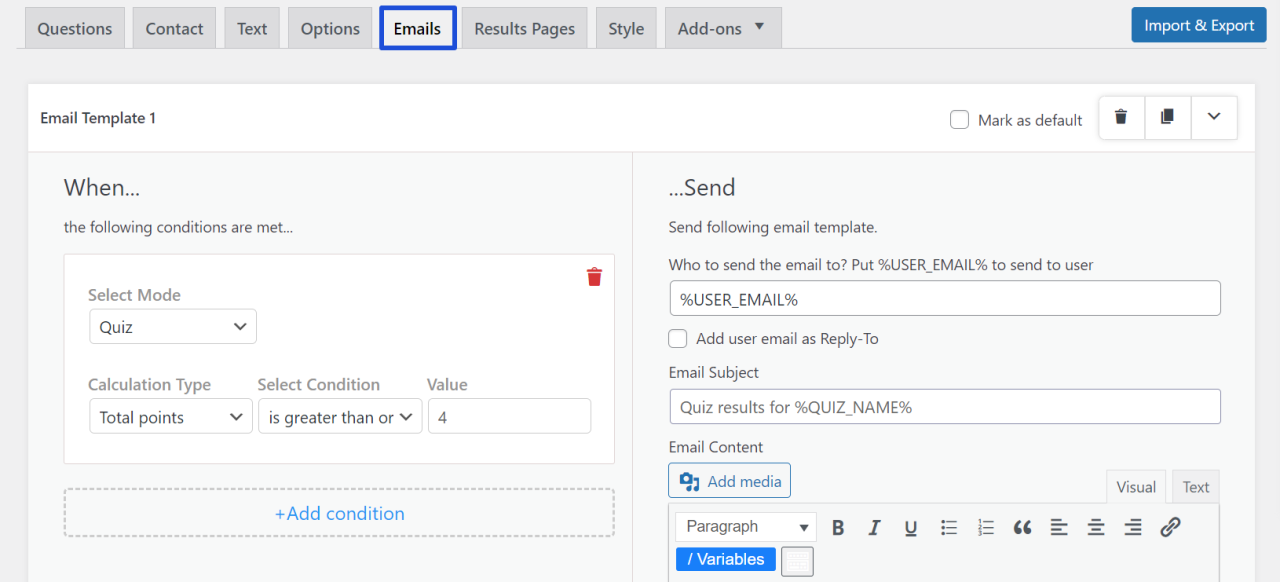
With this option, you can handle which email should be sent to which user, and when to send it. Add additional conditions by clicking on “Add condition” for when specific mail should be sent to a specific user after taking the quiz.
You can customize and individualize the subject and the body of the email in the “Email” tab.
This WordPress leaderboard plugin offers you various template variables. Click on it to copy and paste it into the text and customize it as per your needs.
Save that email for your quiz by clicking on “Save Emails”. Add another email to the quiz with different conditions by clicking on “Add New Mail”.
Also Read: Create a Quiz Using WordPress Quiz Plugin and Offer Certificates
Step 7: Results Pages
At the end of the quiz, you will have to provide your users with a result page of their performance. This WordPress leaderboard plugin offers you various options to edit the result pages for your users.
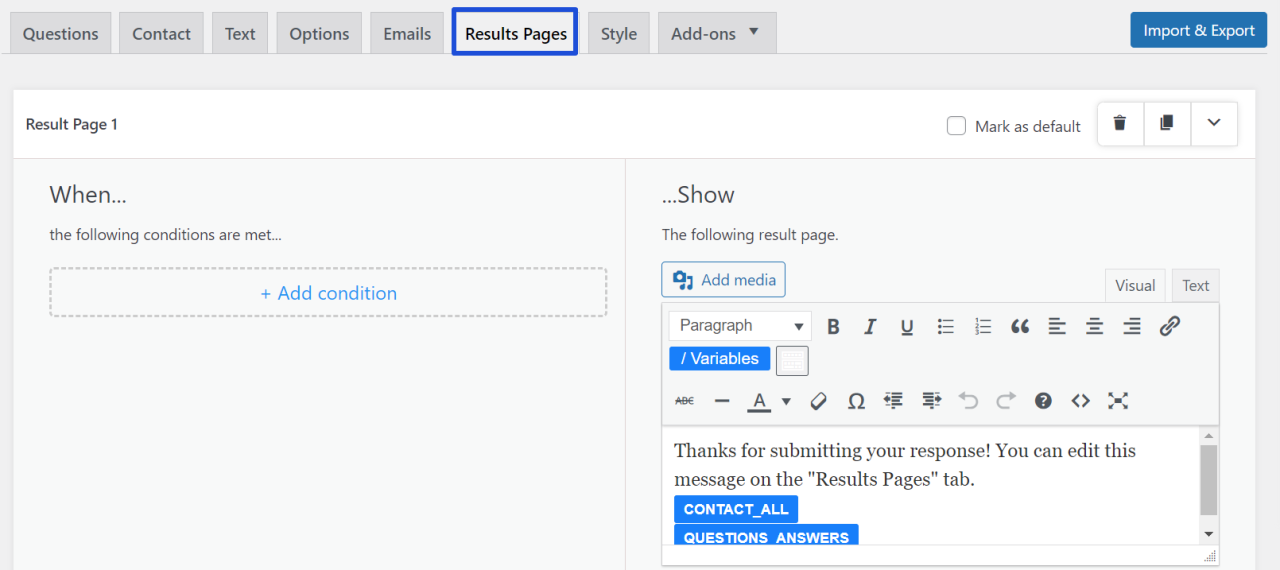
Click on the “Results Pages” tab and select when a specific result should be shown to a specific user by clicking on “Add condition”.
In your quiz, customize the text using various options and insert variables to edit text, by clicking on “Insert Template Variables”.
Step 8: Styles
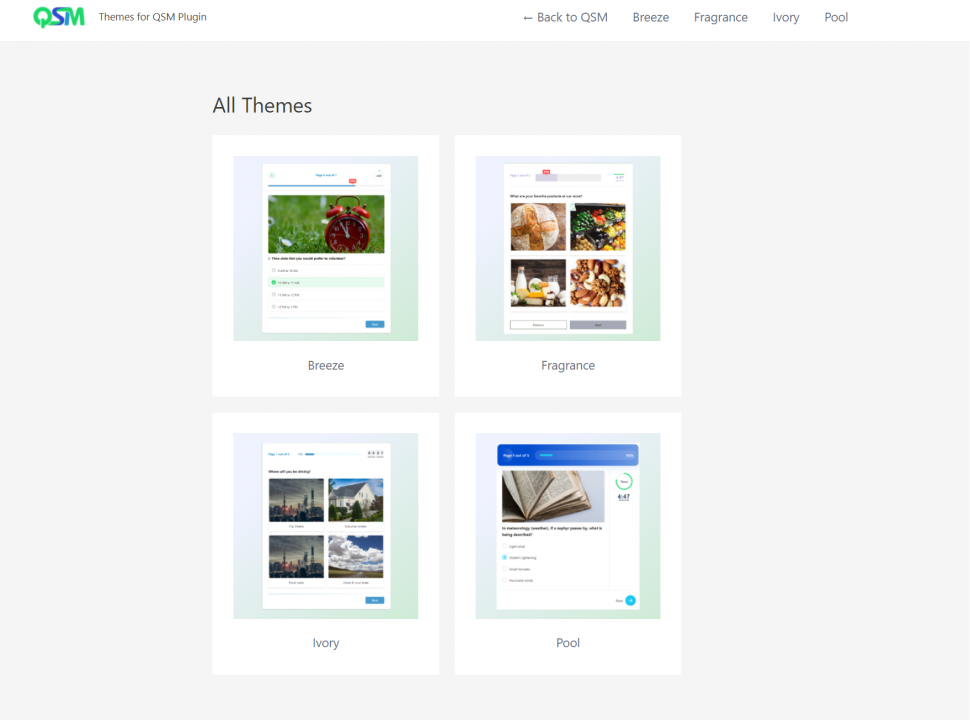
After completing all the steps it’s time to make your quiz look esthetic visually. Click on the “Styles” tab to add themes to your quiz.
There are some predefined themes from which you can choose one for your quiz. If not satisfied with that, you can also customize themes for the quiz using “Custom CSS”.
This WordPress leaderboard plugin offers you Premium themes that you can use and make your quiz look amazing.
Step 9: Advanced Leaderboard for Results
After you purchase the addon, install and activate it. Navigate the “Advanced Leaderboard” tab in the QSM interface.
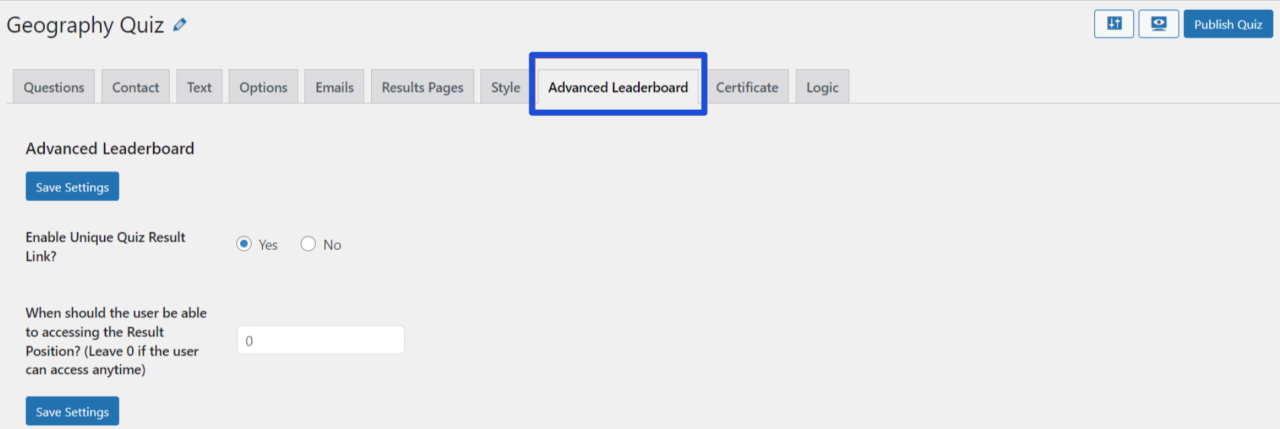
Enable a unique quiz result link to generate a unique link for your quiz. You can handle when a user should be able to access the results. Leave “0” if the user can access the results anytime.
Next, click on “Advanced Leaderboard” in the QSM menu of the WordPress sidebar for more settings of the leaderboard. The Advanced Leaderboard addon has 4 shortcodes and 2 customizable widgets. You will see various options to customize your leaderboard. To use the shortcodes, copy and paste them to any quiz or page.
You can change the number of ranks you want to show on the leaderboard. Give the title to the leaderboard by changing “Title”.
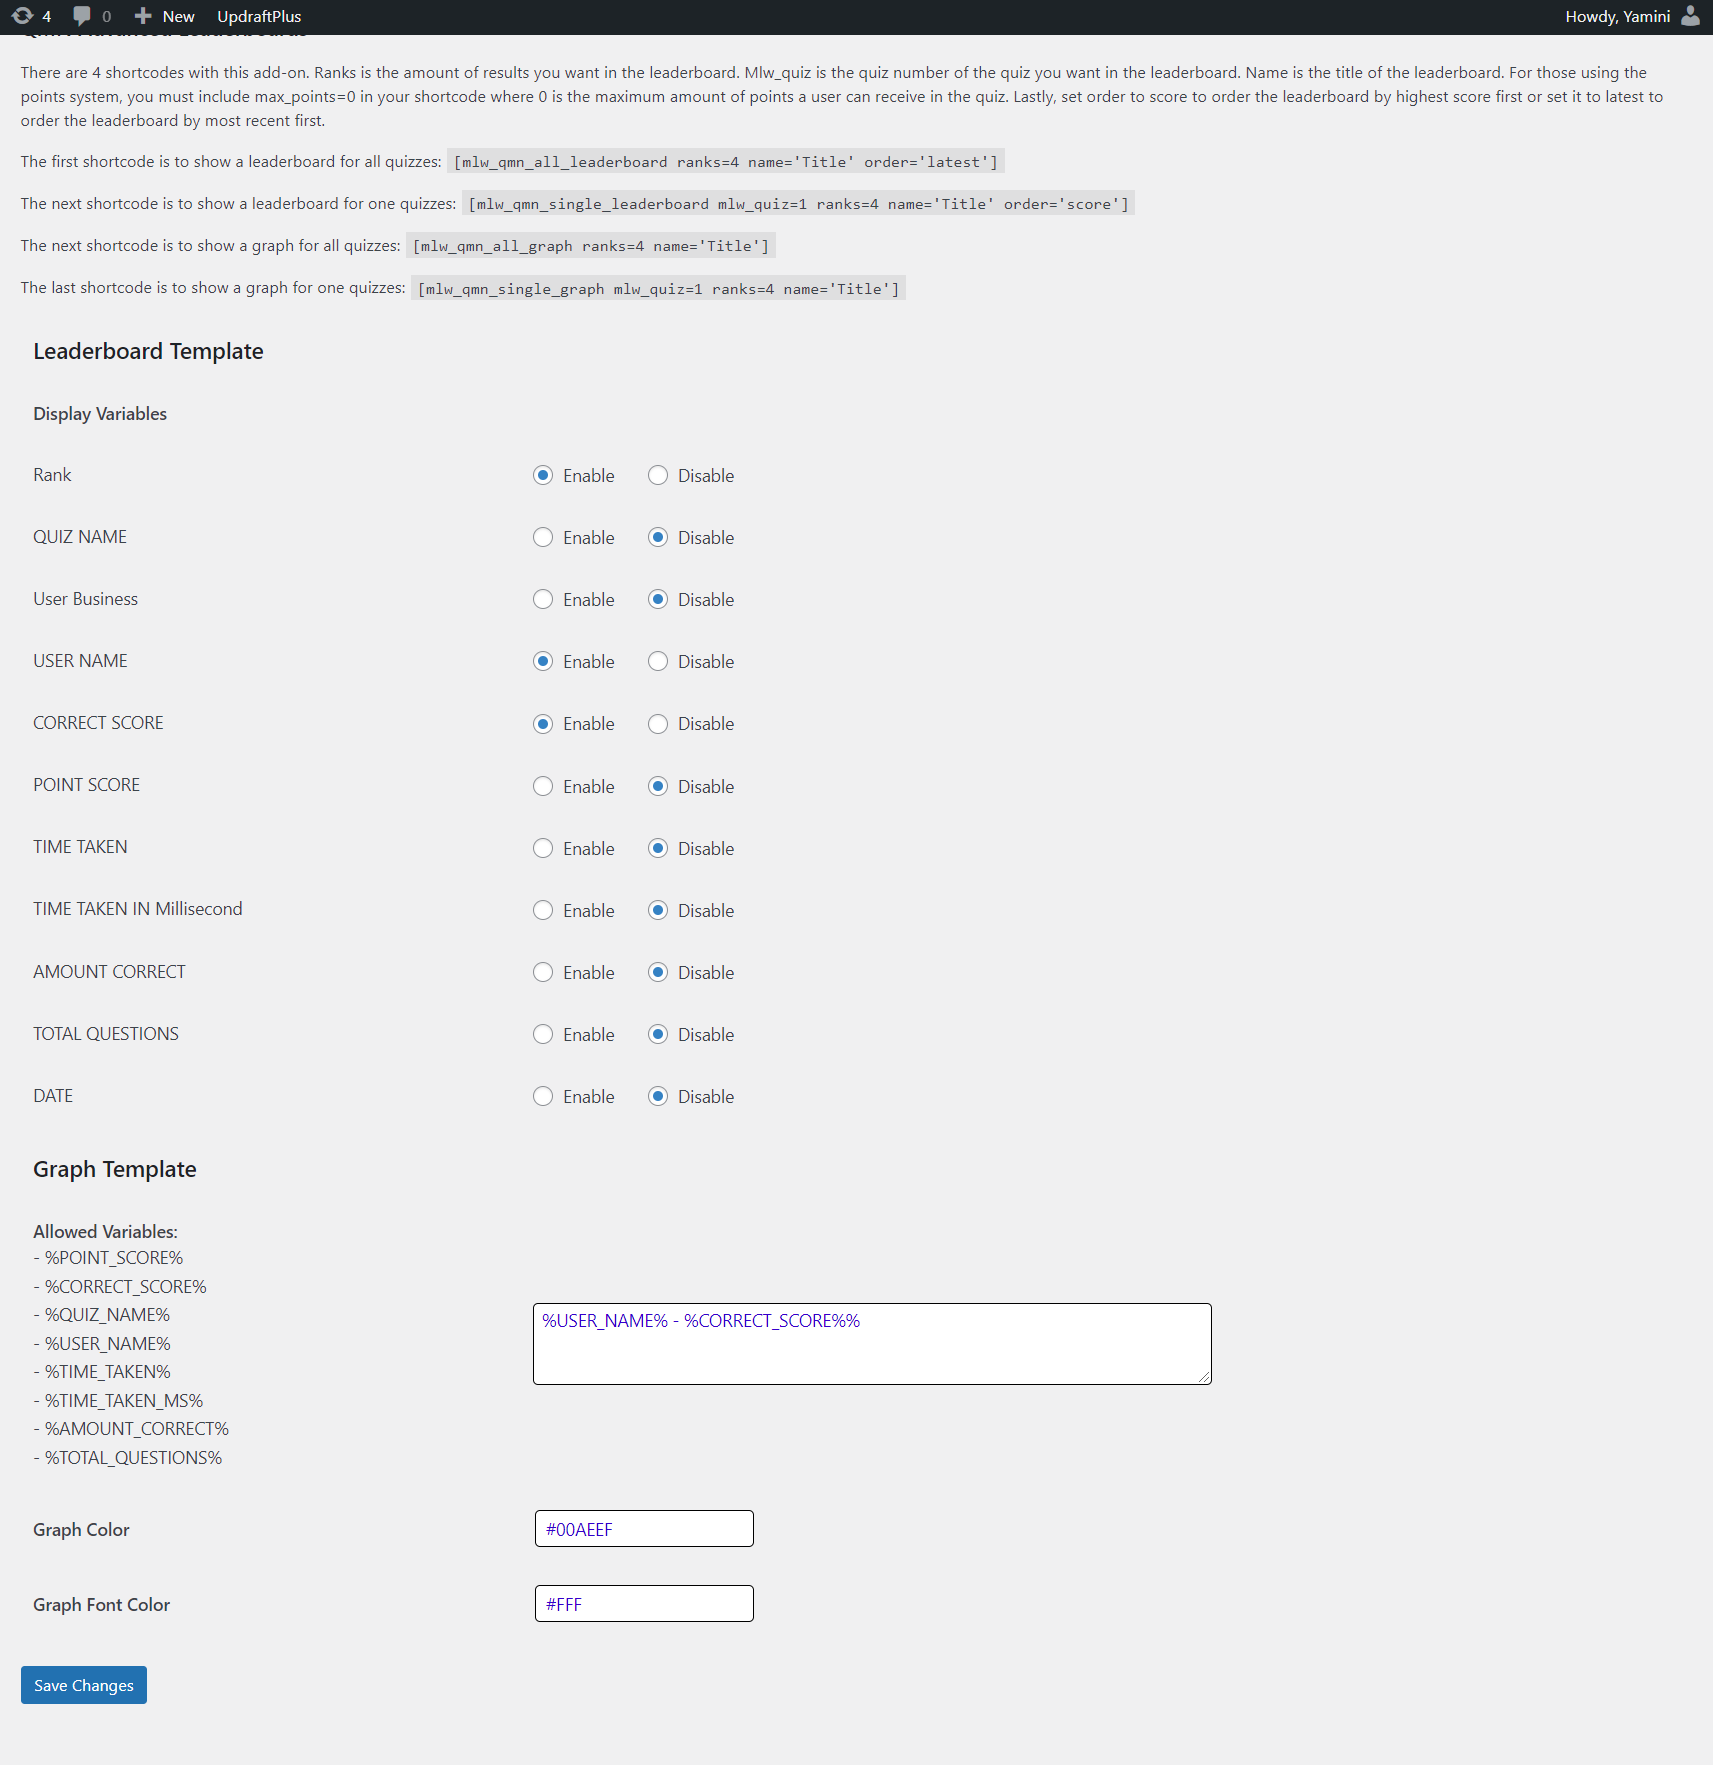
To customize the widgets, navigate to the WordPress sidebar > appearance > widgets. Select where you want to put these widgets and customize them accordingly.
For more information on advanced leaderboards, read “Advanced Leaderboards”
Conclusion:
And there you go!! With these 9 simple steps, it is very easy to make a quiz with a leaderboard. This WordPress leaderboard plugin allows you to customize your leaderboard as per your needs.
Quiz and Survey Master is an amazing plugin for your WordPress site. It helps you create amazing quizzes and surveys even without the knowledge of coding.
Don’t forget to try the QSM Pro Bundle. It has various amazing features that will help you to optimize your quizzes and surveys.
