Want to create a Timer based online exam for your users that will have a real-time countdown timer that turns active as soon as the user starts his exam and to display it on your WordPress Website for free? We’ve got you covered!
We have an awesome WordPress Plugin just for that, it’s called the Quiz and Survey Master plugin that will help you achieve the desired result in this process.
User engagement and retainment is an important aspect of today’s era. Hearing out from your users will definitely help you in shaping the future goals of your business and also in getting valuable suggestions.
Quiz and Survey Master is a multipurpose quiz and survey plugin that can be used to create quizzes, surveys, online exams, assessment tests, questionnaires, polls, feedback forms, and other question-answer forms for your WordPress website.

In this article, we have created a Timer based online exam that allows the user to give the exam whilst the timer runs in the background and the user gets an idea and manages time accordingly so as to finish the exam on time.
Following are the Steps for Creating a Timer based Online Exam in WordPress or watch this video:
Step 1: Download the Free QSM Plugin
Simply download and install our exam plugin from the WordPress plugin directory or from your WordPress Admin navigate to Plugins > Add New > Search “QSM” in the Plugins Search Bar > Quiz and Survey Master comes up now Hit Install.
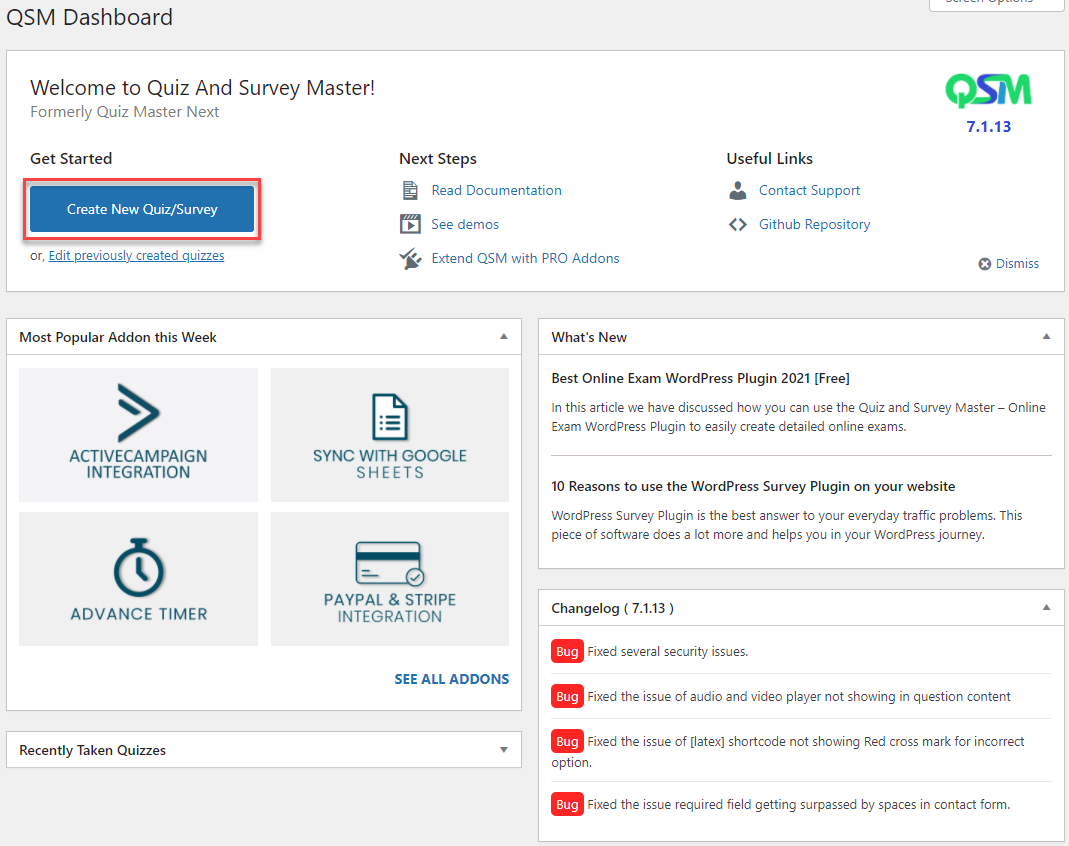
After Installing and Activating the plugin you will see a new Menu called QSM on the WordPress sidebar. Click on QSM and you will be taken to the Quiz and Survey Master Dashboard.
Step 2: Create a New Exam
Once in, Create a new Exam by clicking on “Create New Quiz/Survey”. Enter the Exam Name in the blank field at the top as “Online Exam” or any other name and select the “Time Based Quiz” Template.
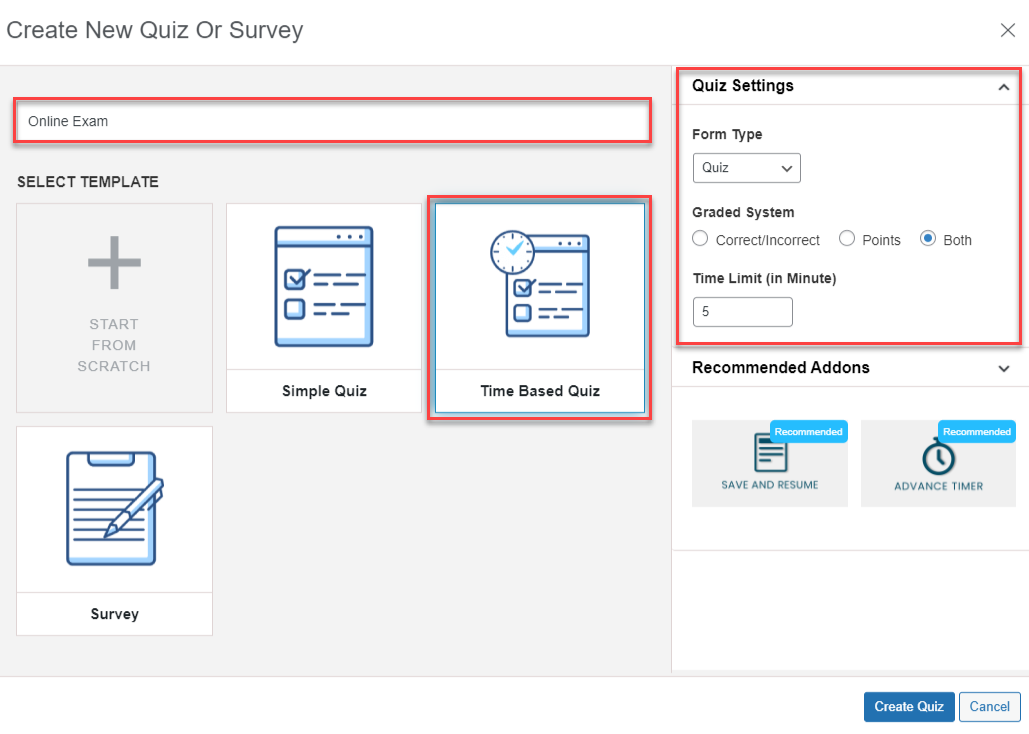
You obviously need a Graded quiz with a Correct/Incorrect System or Points Based System. In the Graded System option select “Both” if you’re not sure. And give a Time Limit for the Test based on the Questions Asked and the Difficulty Level.
After making the necessary edits hit the “Create Quiz” Button and proceed to further configuration steps.
Step 3: Add Questions and Answers
Here you will need to type in your question and the respective answers. You can add as many questions and answers as you like and add them to multiple pages without any limit.
Firstly Choose the Type of question you want to display from the Question Type drop-down list. Quiz and Survey Master has 15+ Question Types including Multiple Choice, Drop Down, Slider(Polar), Fill in the Blanks, Short Answer, Checkbox, Multiple Response, Data, File Upload, etc.
For the sake of this article, I’m going to create a multiple-choice question, so I’m selecting Multiple Choice as my question type and writing down my question in the question field.
You can also add images and other media like videos, gifs, audio, documents as your question. But, as of now, we are good with just a text-based question.
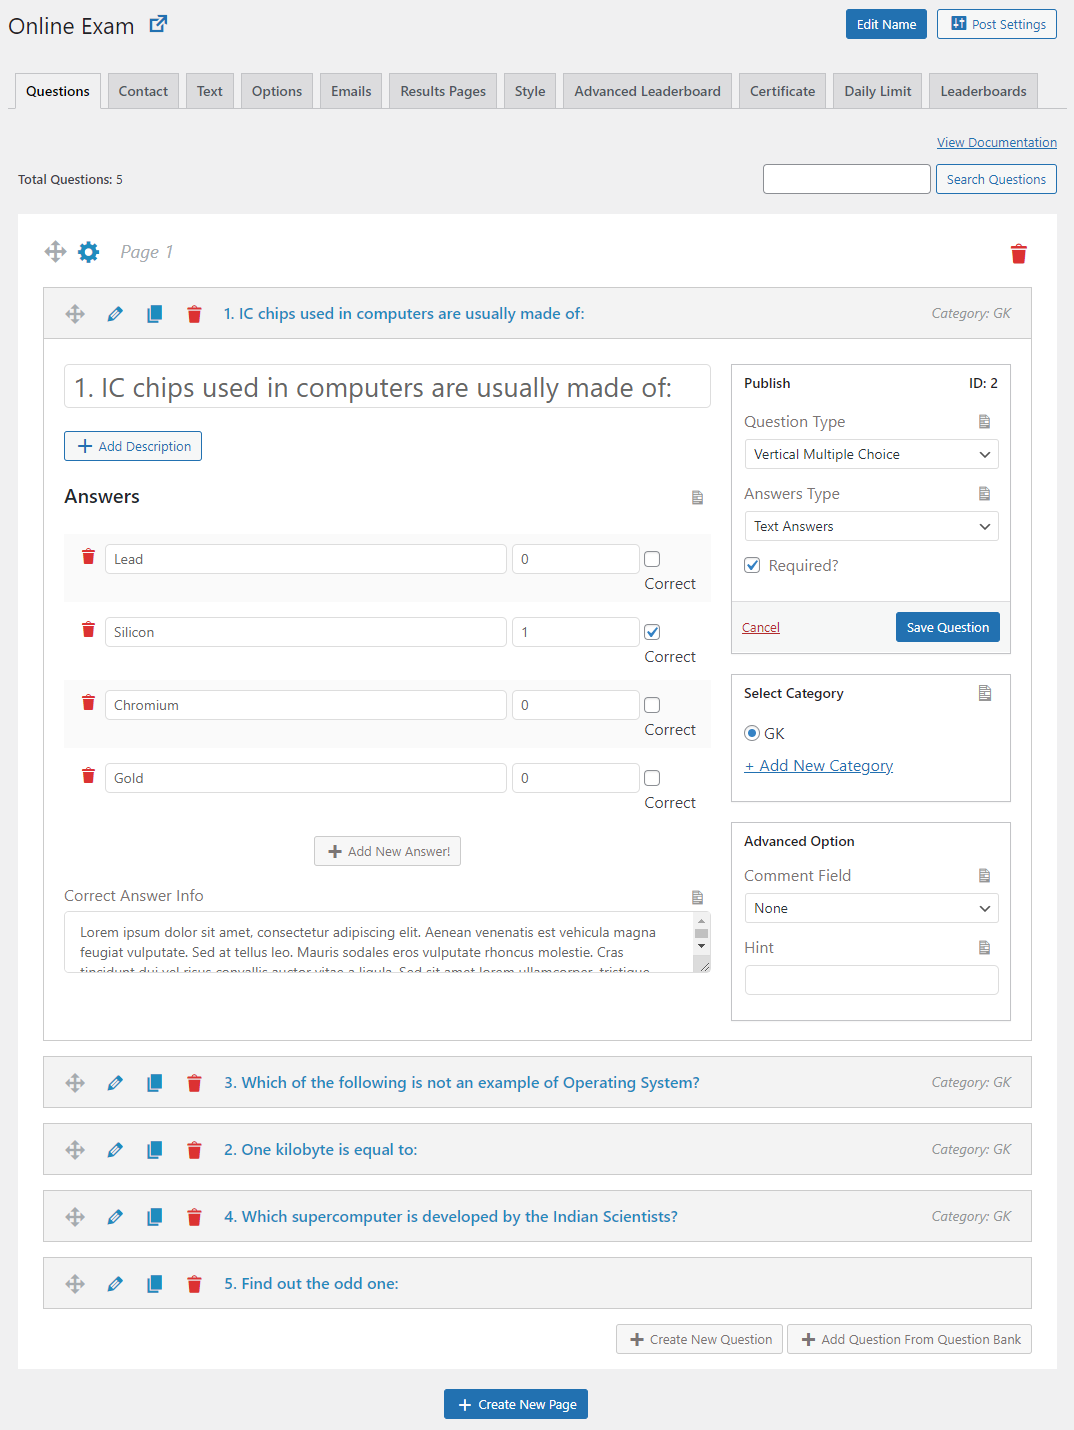
Also, I will provide the user with 4 options to select from by clicking the “Add New Answer!” button. Tick the correct answer checkbox and allot some points to it. Rest all other answers leave it as zero.
You can even associate each question with a Category for example, if the question is about Mathematics you can create a category as Mathematics and assign the question to that category, likewise you can create multiple categories and save questions.
Also Read: Best Online Exam Plugin for WordPress Users
This will be of great help if you ever wanted to import questions belonging to the existing Category to create a new quiz/test.
Step 4: Collecting User Details via. Contact Form
Moving on to the next Contact Tab. You would want the user to put in his name and email address or other details like Class, ID, Gender, etc. before commencing the Test. So for that, you need to press the “Add New Field” button.
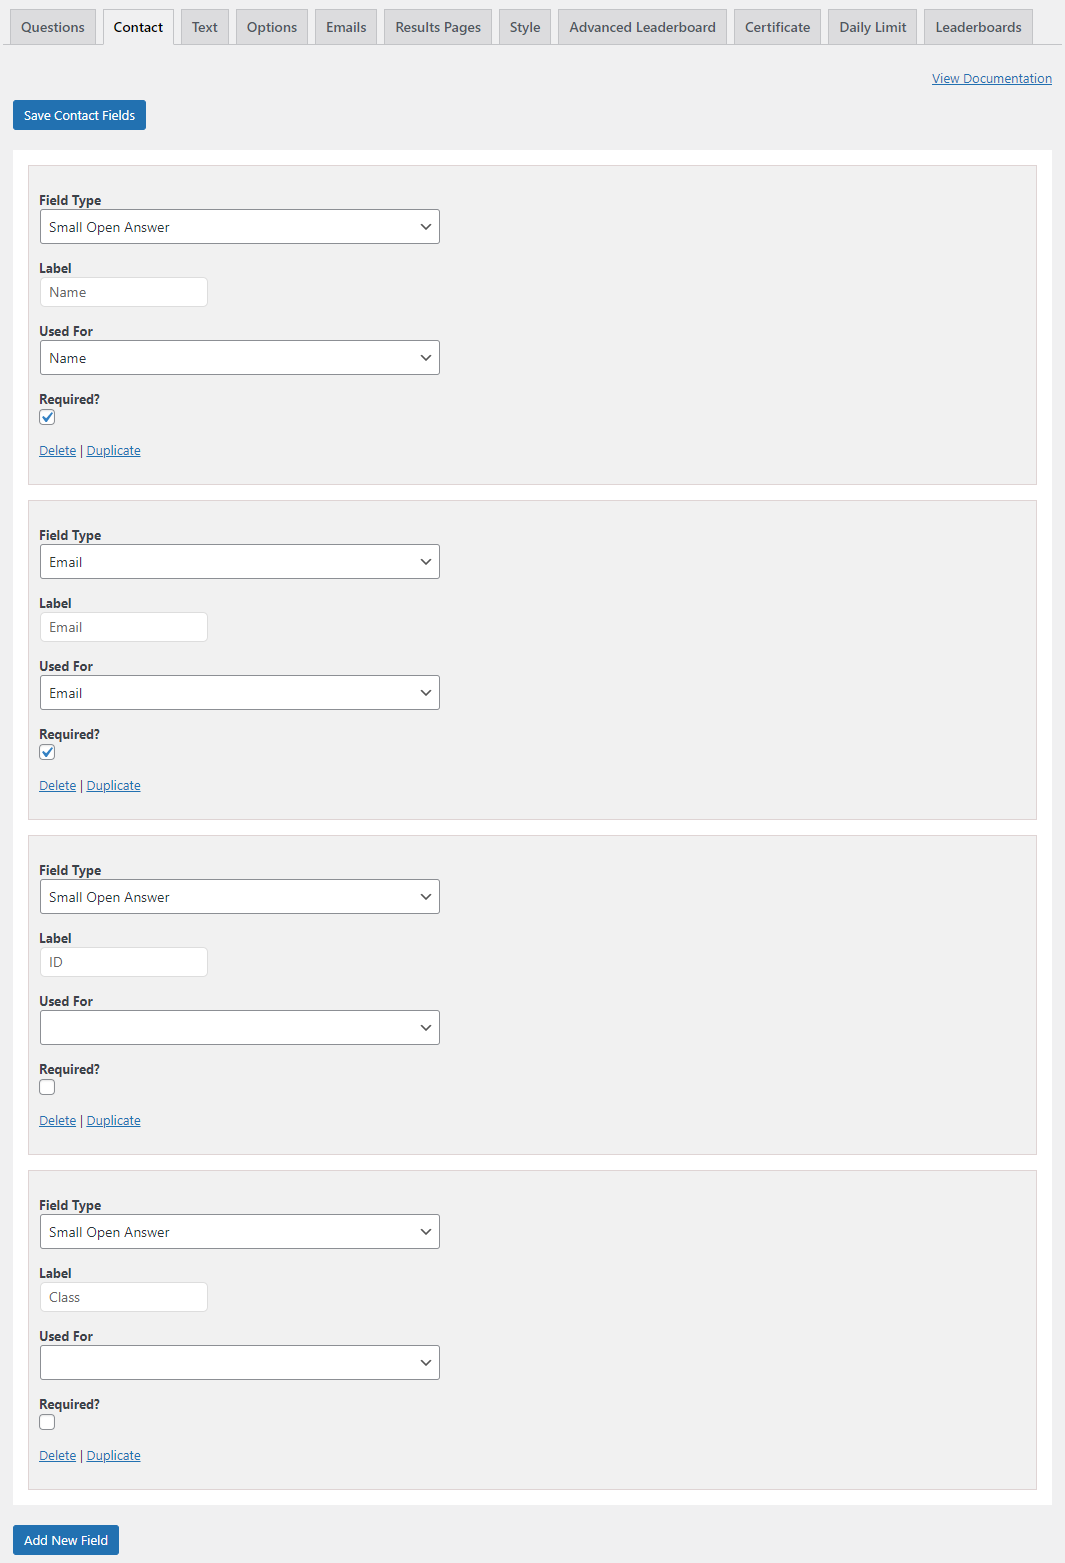
Select “Small Open Answer” as the Field Type and Type “Name” as the label. Also, select “Name” from the Used For dropdown list. Make sure you tick the “Required?” checkbox for forcing the users to enter their names.
Again, Press the “Add New Field” button and create a Field For “Email”, type the label as “Email” and select “Email” from the Used For dropdown list.
Just like that, You can create a field with any name by just Selecting the Field Type as a Small Open Answer and Giving it a Desired Label. No need to select the Used For field, keep it as it is. And, then go ahead and press the save “Save Contact Fields” button to save the configuration.
Step 5: Displaying Custom Message before Exam Commences
Now moving to the Text tab, in the “Message Displayed Before Quiz” text box type the message you would want to display to the user before they commence their Test/Quiz.
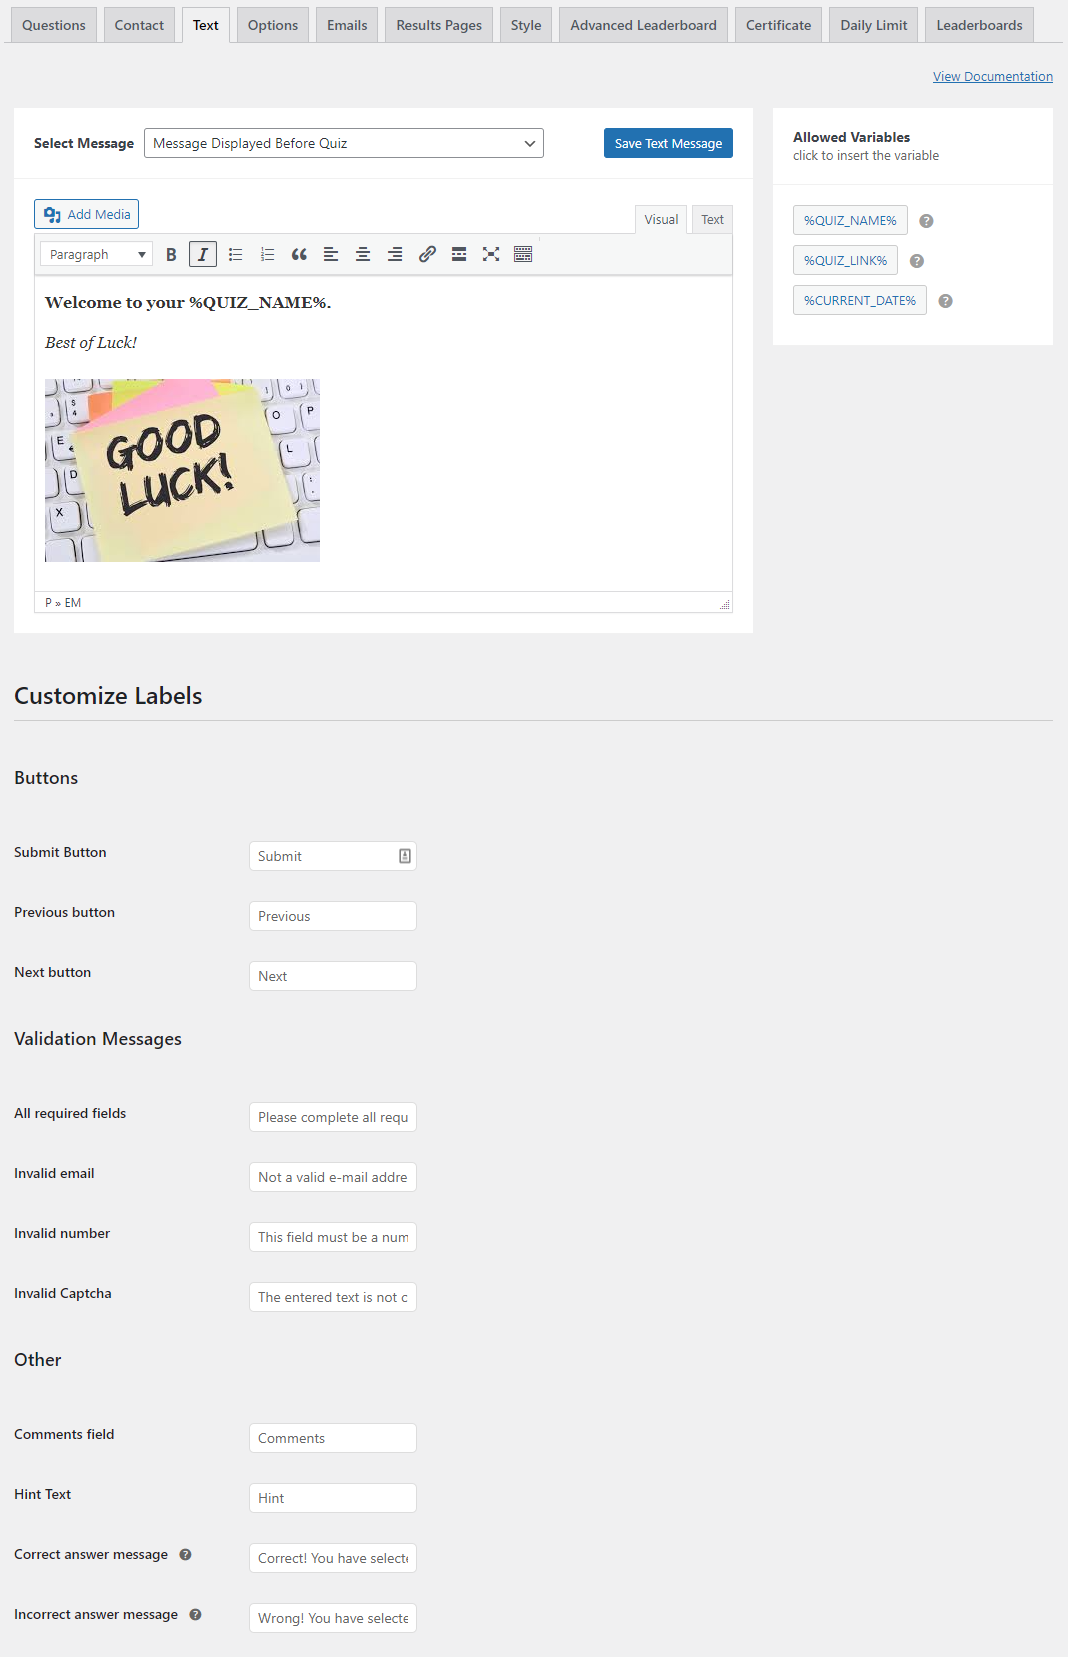
There will be some pre-written text, you can customize it with your own using the allowed Template Variables which can be copied from the box on the right side. These Template Variables are used for the temporary storage of the data and can be called at the time of the Result.
Click the Select Message Drop Down and check out the various Text Messages. There are ten more messages that can be altered, so make sure you check them all.
You can even rename the Button Labels for Submit, Previous and Next Button. Also, you can change the validation messages with your own text.
After making all the required changes hit the “Save Text Message” button and move to the “Options” tab.
Step 6: Configuring the Exam Behaviour
In the Options Tab, you will find numerous configuration options to set your exam. Options like:
- Show Progress Bar
- Require User to be logged in
- Questions to be displayed per page
- Time Limit in Minutes
- Force Submit after time expires
- Skip validations when the time expires
- Limit number of Attempts by a user
- Limit Total number of Entries
- Limit number of Questions to be loaded in the Exam
- Schedule the Exam to a particular date and time
- Generate Random Questions for each user
- Generate Random Questions from a Category
- Show Retake Quiz Button
- Show Correct Answer Inline
- Display Category Name to the user
- Add Quiz Animation by choosing anyone from the 10+ Animations
- and much much more…
Go ahead, and have a look at the various options available. Tweak them as per your needs. At the very beginning of this exam, we’ve set the Grading System as “Both” and Set the Exam Timer to “5” minutes.
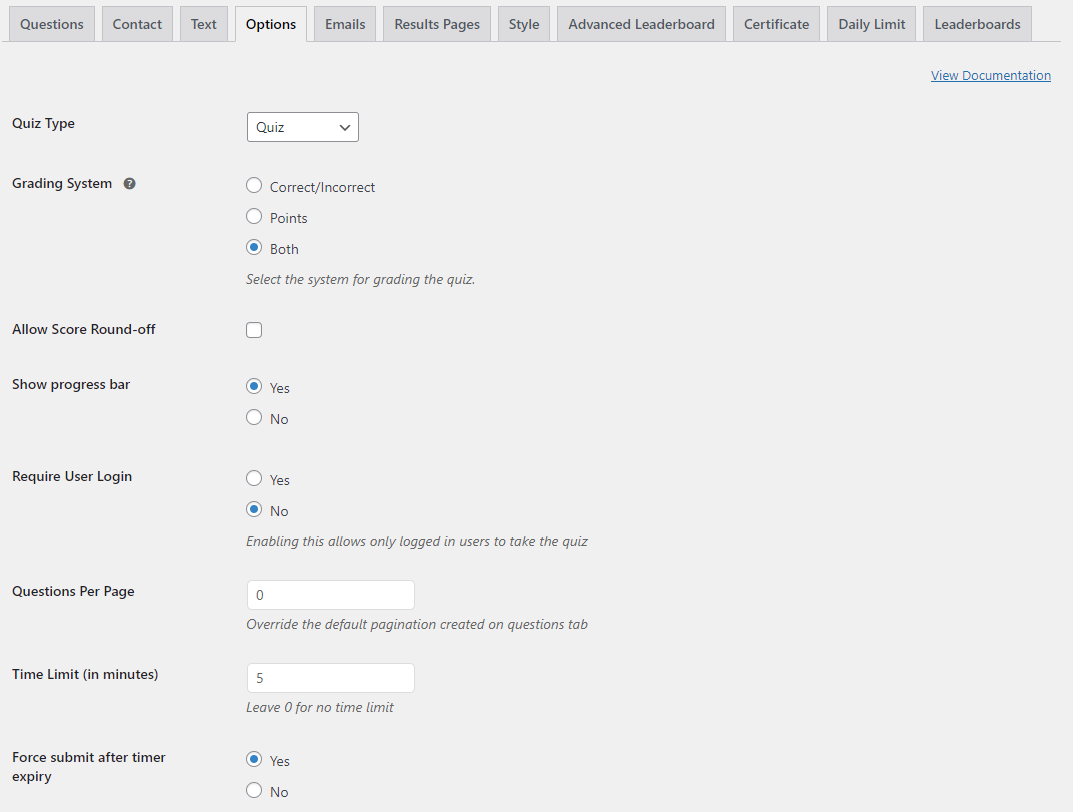
This will make the Exam run for 5 minutes and start the timer when the user sees the very first question. I have also enabled the Progress bar and turned on the Force submit after timer expiry option.
Step 7: Configuring Emails to be sent to the User and Exam Admin
The next tab is the “Emails” tab, which is pre-configured, this sends an email to the user if you have created a form asking for user email in the Contact Tab and also to the admin whenever a condition is met.
By Default the %QUESTIONS_ANSWERS_EMAIL% variable is set that sends an email to the user and the admin displaying the question, the answer provided by the user, and the correct answer. I won’t make any changes to it and keep it with its original configuration.
However you are free to checkout all its settings and the 30+ Allowed Template Variables.
Step 8: Configuring the Final Results Page
Next is the “Results Pages” tab, in this tab you need to configure how the result would be displayed to the user. You can play around with this and make your own configuration or else follow my configuration as seen in the below image.
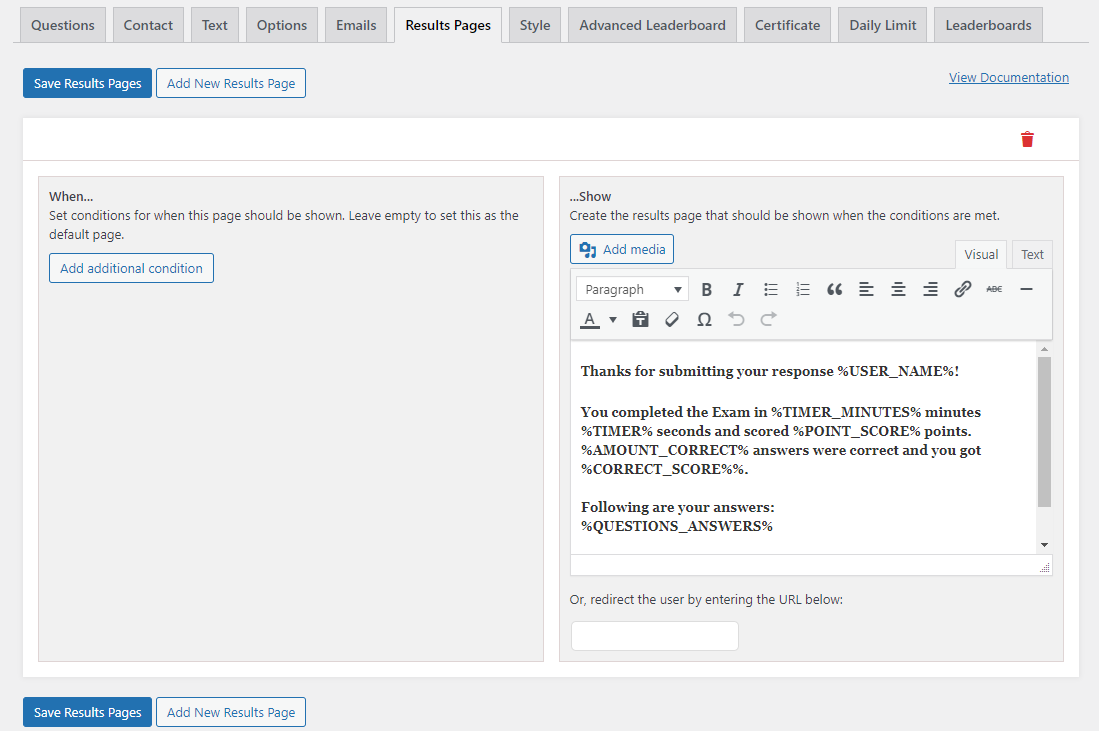
Thanks for submitting your response %USER_NAME%!

You completed the Exam in %TIMER_MINUTES% minutes %TIMER% seconds and scored %POINT_SCORE% points. %AMOUNT_CORRECT% answers were correct and you got %CORRECT_SCORE%%.

Following are your answers:
%QUESTIONS_ANSWERS%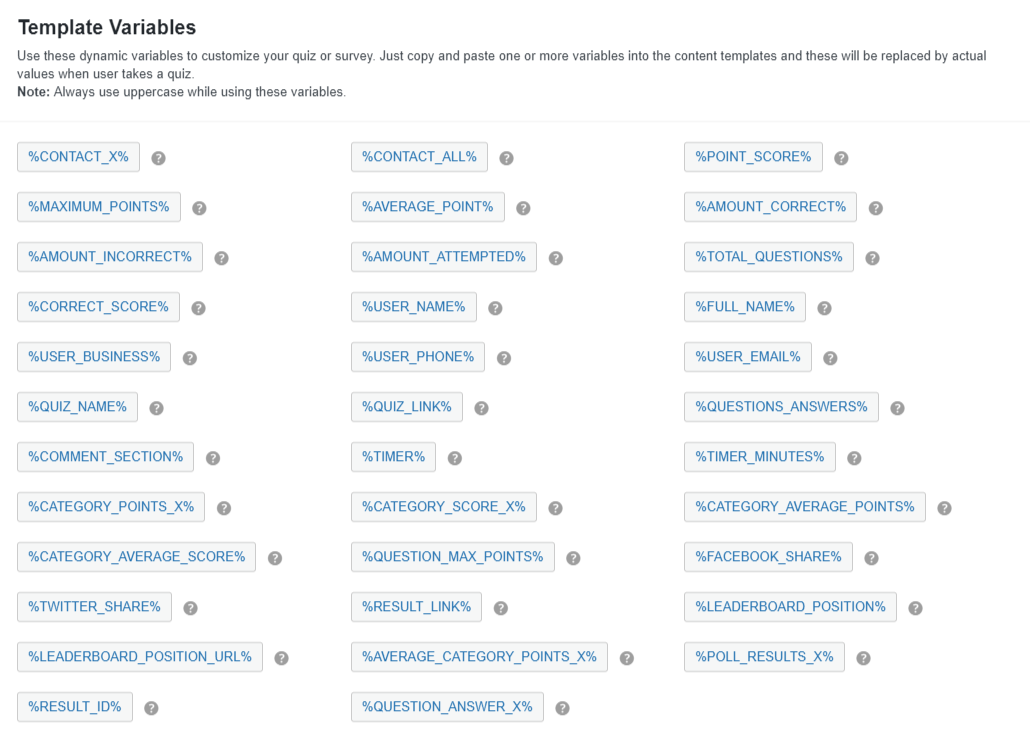
You are free to add any of the 30+ Template Variables from the floating Template Variables Menu at the bottom of the Results Page to customize your Exam Results Page. You just need to copy and paste one or more variables into the content templates and these will be replaced by actual values when the user takes the Exam.
Also Read: How to Build a Responsive Top Navigation Menu without Coding?
After making the required changes hit the “Save Results Pages” button.
Step 9: Styling the Exam
The next is the “Style” tab with some pre-defined styles. There are a total of 5 Accent Styles that come bundled with the Quiz and Survey Master Plugin. You also have the option to add your own Custom CSS Style if you happen to add one, get creative and add your custom CSS styles to it.
I will go with the default Primary Style and hit the “Save Quiz Style” button.
Step 10: Preview and Publish Exam
To preview the current set configuration click the Preview Icon, this will open up the Exam Preview on a New Tab.
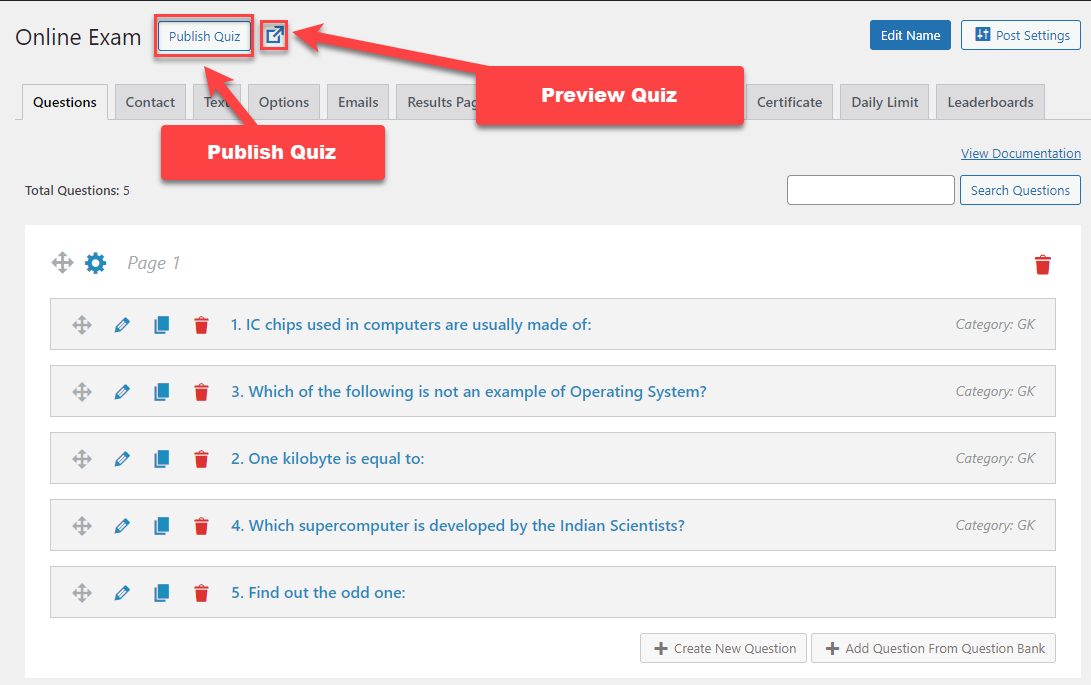
If you are happy with the Set Configurations then you can go ahead and hit the Publish Quiz button to make the Quiz Live and accept responses.
Now to Embed the Exam on a Page, Post or just to create the exam link you require the Embed Code that you can copy by navigating to QSM > QSM Dashboard > Edit, previously created quizzes > Copy Shortcode as an Embed Shortcode or a Link Shortcode.
Conclusion
This is how you can create a Timer based Online Exam in WordPress using the Quiz and Survey Master Plugin for Free.
Quiz and Survey Master also has 34+ Pro Addons that can help you build more advanced quizzes and integrate them with multiple third-party services.
You can go for the QSM Starter Bundle (consisting of 7 Premium Addons) or the Premium Bundle (All 34+ Addons plus addons which will be released in the future).
Make sure to play around with it, and come up with an awesome online Test/Quiz on your website. Visit Quiz and Survey Master Documentation to find more on this amazing plugin.
Stay connected to regularly get such exciting new updates. Tell us your thoughts in the comment section below.
